Double dose of DIY
It’s a sad fact of life that all good things must come to an end, holidays in particular. I’ve had three whole weeks off but am back to the daily grind tomorrow – not that I’m really complaining as I know most of you were back last week! I wanted to do lots of things but somehow what with getting the flu for my Christmas present and then a knock-out heatwave, most plans just fell by the wayside, including most of my sewing/DIY projects. I did manage a few things though, and so before I go back to being all busy again, here’s a double dose of DIY.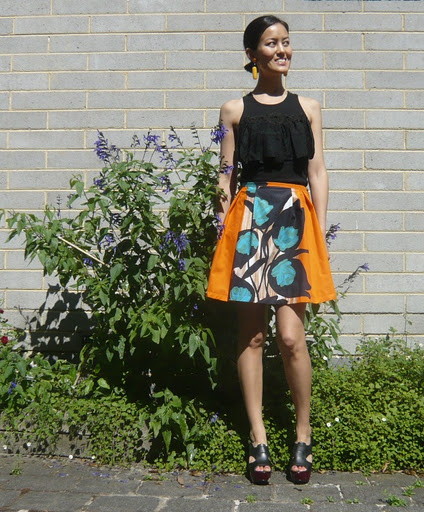
I made the singlet top years ago so can’t show you a “before”, but it’s a black tank top with “Diamonds are a girl’s best friend” printed on it (I got it as a novelty from some shop opening or other). That logo isn’t really true of me (“crap from an op shop is this girl’s best friend” would have been more appropriate), plus I can always use a bit of help in the bust department, so I disguised the print and added a bit of volume in the form of fabric detailing at the same time.
I made a very wide frill by gathering an old kimono sash, attached it to the singlet using zig-zag stitch (this is a must if you are stitching something to a garment that is made from stretch material, as was the singlet, because straight stitch will just break). Then, to cover the top part of the frill, I stitched fabric yo-yos to it.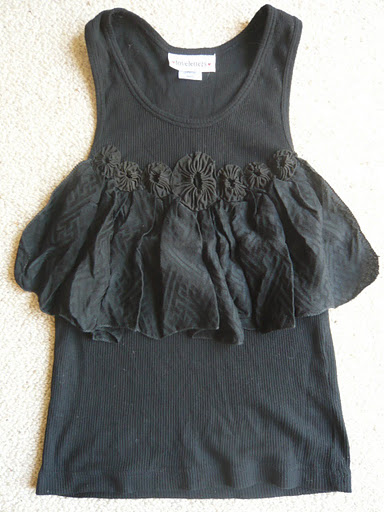
The second DIY is the skirt, which originally looked like this when I bought it at Savers for about $7.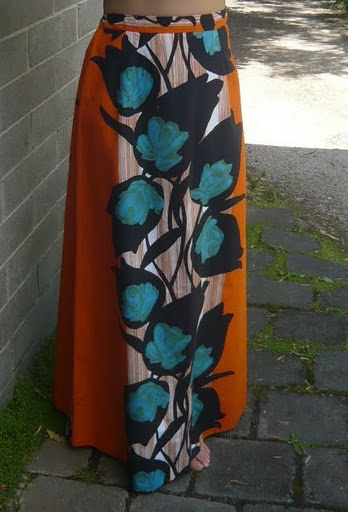
As usual when it comes to chopping up vintage garments (or any garments, for that matter), I ummed and aahed for ages before picking up the scissors. Someone lovingly made this back in the ’60s or ’70s, after all. But I knew I wouldn’t get much wear out of it at its original length.
Being lazy, I kept the original hem, cutting horizontally across the skirt to give myself an above-knee-length section of material. The skirt only has side seams (no back seam) and I put a zip in the left side seam, then fitted it on myself to work out where I wanted the pleats. If you can, it’s always easier to put a zip in something before fitting it, because then you can take it off and put it on to check things without having to rely on pins everywhere.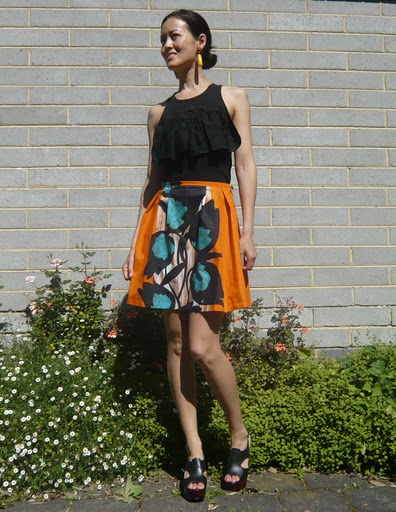
Then I just cut a long strip from some of the excess material on the inside of the hem and created a waist band… and voila! A ’70s style skirt has now gone back to the ’50s!
I have mentioned “gathering” to make a frill, yo-yos and other crafty terms before, but if you’re not familiar with them and want to try them out for yourself, I’d suggest visiting your grandma, or failing that, using the lean green Ecosia machine to find a tutorial – there are so many people on the internet who can do a much better job with explaining AND with technology than I can!
These are gorgeous DIY. You did a great job in transforming those vintage outfits to a more wearable style. We love it!Much love from the SABO SKIRT girls! SHOP: http://www.saboskirt.comBLOG: http://www.saboskirt.blogspot.com
Beautiful! I love this diy. You look stunning! xx
Both great refashions – I know what you mean about cutting into vintage stuff but you've breathed fresh life into the skirt and it'll see more wear now. I'm back tomorrow too, struggling with the prospect!
This is great! I like the ruffle; how smart to add that way. I pinned this to Pinterest.http://pinterest.com/pin/186125397069632060/
That skirt is so cute!Love Grace.
nice. xdevorelebeaumonstre.com
That skirt is amazing! Like you I have to think twice about cutting into a vintage piece but you are absolutely right – what's the point in keeping it in a form you'll never wear?