Retro-fitting retro style #2
OK, so I know this looks like just an excuse to post photos of this dress yet again (this is the third consecutive post it has featured in!) and I admit I am loving myself in it, but stay with me here: if you can get past me swaggering around in it you’ll also learn a life-changing sewing technique.

Photo by Kayla Piccolo Photography
I made this dress in about 1994 from printed Thai silk that my grandma had bought, I presume maybe back in the 70s? Sorry for the bad photo, I can’t find any others of it! It’s a pretty basic shift-style sleeveless dress.
Its retro (well, at the time it was bought it was contemporary!) print was perfect for a 60s-themed party that a uni classmate was throwing and as I recall, I wore it with some chunky gold heels from the Chapel Street Bazaar. I did wear it a bit in the years following, as it’s good for really hot weather (in that pic above I’m wearing it in Bali and you can’t even tell that I’m sweating like a proverbial pig, thanks to the print!). However, when I made it I didn’t line up the print properly so it was always a little bit crooked, and it was also starting to feel a little bit short. I was also wanting a more feminine, flirty, 50s kind of look. Retrofitting a 60s style dress to look a decade older, so to speak.
I removed the neck facing and cut straight across so that the print wasn’t crooked any more, removing the shoulders at the same time because I didn’t like the neckline. Yes, I should have attached proper facings at the front and back neckline but I just ironed on some interfacing and folded the fabric over (so lazy, I know!). To replace the shoulders, I thought spaghetti straps might be fun, and here’s where the life-changing sewing technique comes in. If you’ve ever made spaghetti straps before you will know it takes about a zillion years to turn them the right way out, but not with this little hack that I picked up from a “couture techniques” sewing class about 10 years ago.
Once you’ve cut the length of fabric to make the straps, simply attach a long piece of wool or string to the right side of the fabric so it runs down the inside of the fabric tube when you sew down the sides.

Step 1: Centre the wool at the end of the fabric…

Step 2: Fold right sides of fabric together, stitching over wool at the end to secure it in place.

Step 3: Sew fabric down one side, making sure not to catch wool in the stitches.
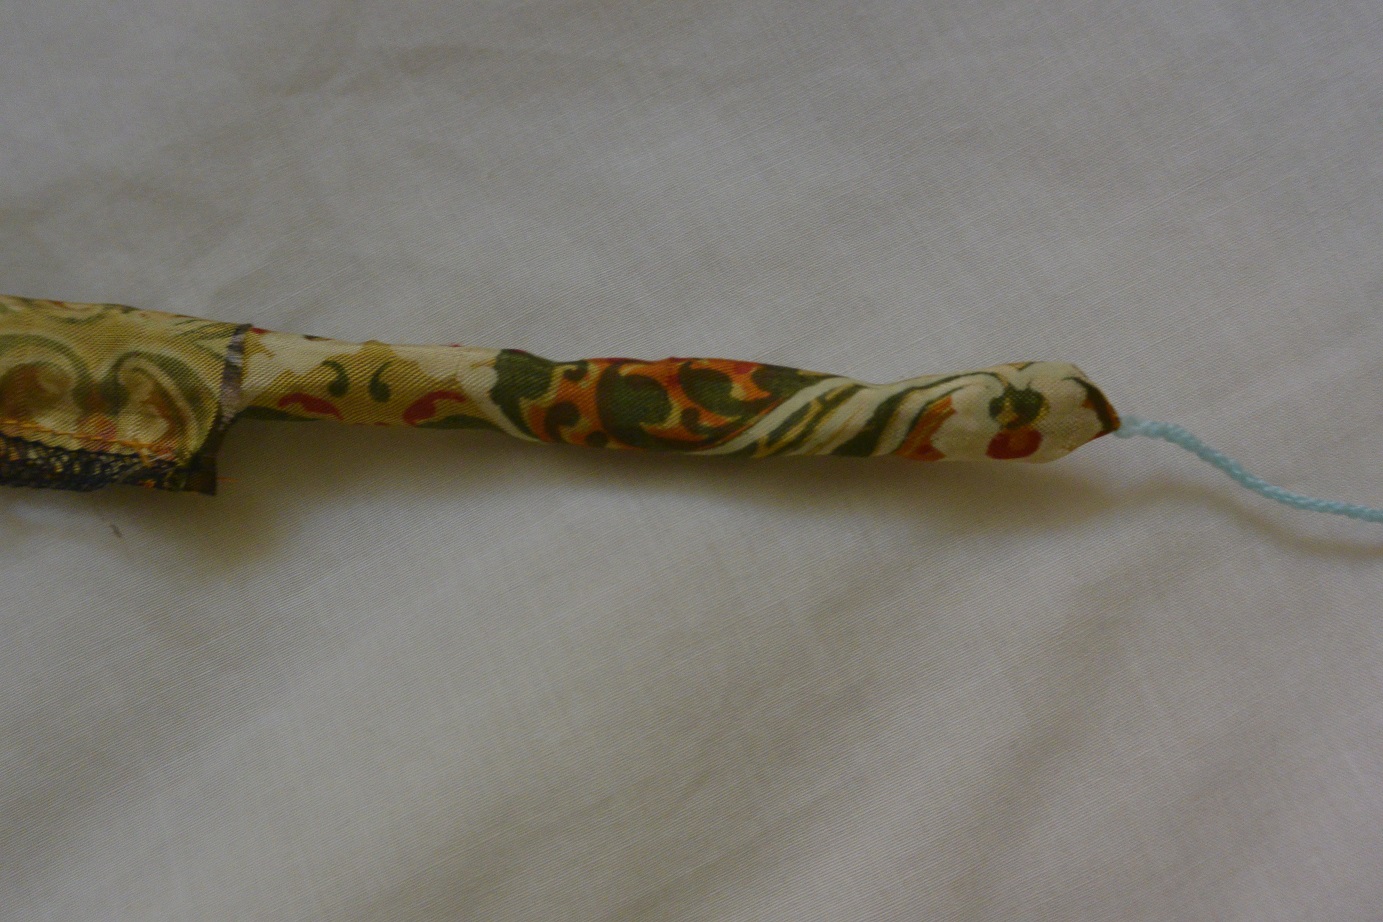
Step 4: Gently pull the wool to turn the strap right way out. Then cut off the wool, obviously. TOTAL GENIUS, RIGHT?
As I still had some of the fabric left over (yes, from more than 20 years ago. Regular readers will not be surprised in the least, haha) I added a flounce to the hem, making it a bit higher at the front so it dips at the back. Got to keep things a bit interesting! If you’ve got a boring (or crookedly made!) shift dress, maybe you could try changing the straps – it’s a good way to use up fabric and looks cute either in a similar shade to the dress or in something completely contrasting. And you can go completely over the top and tie great big bows on your shoulders, should that be your wont. (*Hunts through wardrobe for other shift dress to retrofit with massive ribbon straps*)

Photo by Kayla Piccolo Photography
Thanks Leeyong. I learnt something from you today. What a fab trick. That is a great dress too. Erica
So cool- and love that green sash/belt with it too!
That’s the great thing about sewing and adapting your own stuff: there’s no limit on how many times you can do it! I love the way you re-worked the dress. It looks fantastic with that green obi-style belt, too.