Add some puff to ready-made stuff
A few years ago I was very proud of myself for making this pink dress and neckpiece out of a shawl I found for $5 at an op shop. I wouldn’t normally wear it without a belt because it makes me look like I have absolutely no waist or hips but I just wanted to show you what it looks like with nothing added.
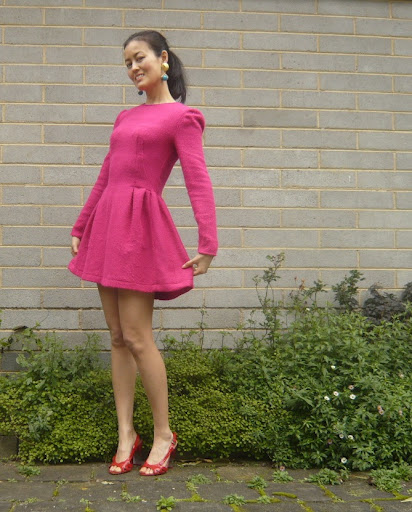
I wasn’t getting much wear out of it because as I said, it makes me look too straight up and down (this dress doesn’t lie! I AM straight up and down!), and the material in the skirt tends to stick to tights because it’s kind of fluffy. So I added a bit of puff to the skirt and now it looks like this.
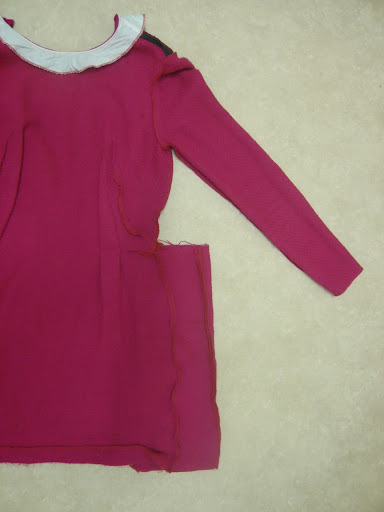
Want to know how I did it? I haven’t worn the dress recently, but I rarely wore the matching neckpiece either, so I decided to rip it apart and use the material in that to add to the skirt part. There really wasn’t very much but even the slightest bit of extra fabric makes a big difference to a silhouette, so out came the unpicker! I then unpicked the side seams of the skirt part and attached the extra bits from the neckpiece, as you can see here (this is the inside-out view). The sticking-out bits are the bits I’ve added on.
I then cut a little way into the original waist (the part I’m holding here is the bodice side seam) and gathered the new added skirt section before reattaching it to the bodice.
Normally it’s not so easy to alter the shape of a dress like this unless the bodice and skirt sections are made separately, but this is one way of doing it. Unfortunately I’m not so sure if you can understand what I’ve done… if anyone knows what the proper term for this technique is, feel free to comment.
The main thing is, the dress is now much more flattering on my stick figure!
The extra volume around the hips gives the illusion of a waist, which is always welcome!
If you wanted to add volume to the skirt of one of your own dresses, you could try doing it this way, but if you don’t have extra material to do it with, side panels in a different fabric could be effective – and you could just sew them over the top of the skirt at the waist instead of attaching them to the side seams.
数年前にこの
ワンピースとネックウォーマーをチャリティショップで買ったショールから作りました。 でも、ウェストマークがあまりはっきりしないのはいつも気になってしまい、この間作り直すことに決めました。ネックウォーマーはどうせいあまりしなかったので、ほどいてしまいました。そして、ワンピースのスカート部分の横の縫い目もほどき、ネックウォーマーだった生地をつけました。ギャザーして、ボディスに再度縫い付けました。自分の体のラインがまっすぐでウェストのくびれがないのはいつも気にしちゃうけれど、こういう風にボリュームをヒップ部分に与えたら少しでもフェミニンな感じになりますね。いろいろほどくのが面倒くさければ、ただ生地をギャザーして、ウェストの横に縫い付ければ似たようなルックスはできると思います。やってみたら教えてね!


This is ingenious!!! the skater skirt look has received justice on you!! Love your creativity and THAT figure! xx
It's amazing the way a simple tweak can make such a difference! The dress suits you perfectly now.
Love it! I liked it before too but it looks great now 🙂 Love that colour!
I liked the first version, but the second incarnation is really lovely. I think the colour is gorgeous. I have a rhododendron almost the identical colour. I thought it was interesting to see the colour with black tights and shoes in the first pic and bare legs and heels in the last – lovely contrast to show what can be worn with such a lovely strong colour. Well done.