Put a peplum on it
Hello sewing types! It’s been a little while since I’ve posted a DIY but hopefully this one will make up for that. It’s also about how to easily take an outfit from work-safe to “wow”, so you office ladies might like it too!
You might remember I mentioned I have been doing a patternmaking course which involved us drafting a basic skirt based on our own measurements. We were meant to make it in plain calico, but you can guess what I thought about that idea. Why use plain fabric when you could use print? Anyway, the basic skirt looks like this – quite appropriate even for office wear, as my geek-girl glasses are meant to be indicating.

The thing is, as you’d know by now if you’ve read much of my blog, I’m rarely satisfied with basic pieces. I don’t think I even own a skirt in this simple shape! So although it is fine to wear it as-is, I wanted to give it a little something extra. And where should I find that but in the May issue of Vogue Australia…

As the credits attest, the model is actually wearing a silk stole around her waist, but to me it looks like a detachable peplum. I know I’m a bit late to the party when it comes to the peplum, but better late than never! Anyway, making it detachable means that once the trend is well and truly dead, the peplum can sit in the cupboard for a bit while the skirt can still be worn. Or you could wear it around your neck as a stole. Not a bad idea, I think you’ll agree. Here’s the how-to.*
1. Cut a circle about 20cm wide (or as long as you want the peplum). The inner hole needs to be a bit bigger than your waist measurement – if you divide your waist measurement by about 6 you should get the radius of the inner circle. Also cut a long strip of fabric about 8cm wide and long enough to be able to tie in a bow at your waist.

2. Neaten the outer edges of the circle by stitching a narrow hem. Match the centre of the long strip and the centre of the inner circle and pin together. You may have to gather along the inner circle a bit (check an online tutorial for how to do this). Tie around your waist to check the fit – don’t forget you will need to make the inner circle part so that each end doesn’t overlap, or you won’t be able to tie a bow.
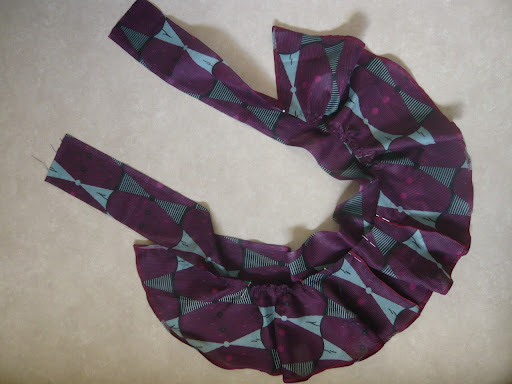
This shows the gathers:

3. Stitch long strip to inner circle, then fold the other edge of the strip over the stitching to conceal the seam. Sew the long edges of the strip together neatly to finish off.
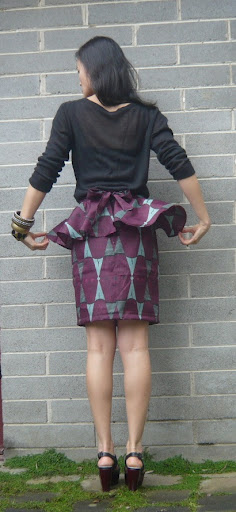
Tie it on around your waist and voila! I’m wearing exactly the same as in the photo above – all I’ve changed are my accessories and shoes – and added the peplum.

Here’s what it looks like from the back.
Of course you could tie it at the side, or at the front instead of the back for another slightly different look, and how about making a peplum in a totally different colour or fabric? A boring black straight skirt would really perk up if you added a peplum in gold or bright pink! Even if you only made the waist tie in a different fabric I think it would be very effective.

What do you think? Will you give this DIY a go when you next need to go from your desk straight to a date? I’m looking forward to trying it – once I can get a date, that is… !!
*If you don’t feel like mucking around measuring circles, the peplum could be made with a long rectangle of material instead, but you definitely will have to make gathers in it. It will end up having less volume in it, probably looking a bit more like the Vogue picture.
this is amazing! I'm definitely going to try it out soon.great job xhttp://www.sevenautumnleavesblog.com/
You are clever – I love your peplum x
Love the peplum it looks gorgeous!xx
Pingback: VAMFF favourites | Style Wilderness
Pingback: The caftan story continues | Style Wilderness